Today I will demonstrate how to load driver data into SAP TM, using LSMW.
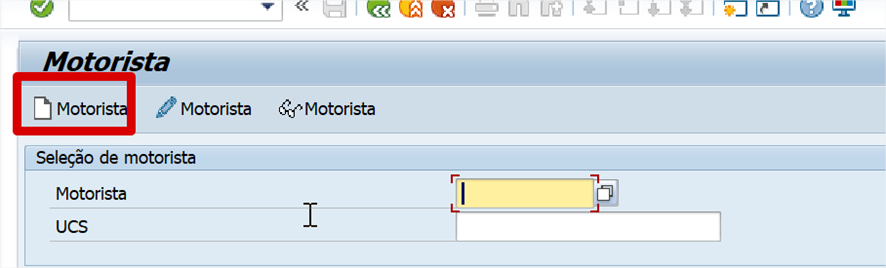
First register a sample driver to demonstrate SAP functionality in transaction
/n/SCMB/TMSRESLBR.
When entering the transaction, click on create driver or press the F5 key:
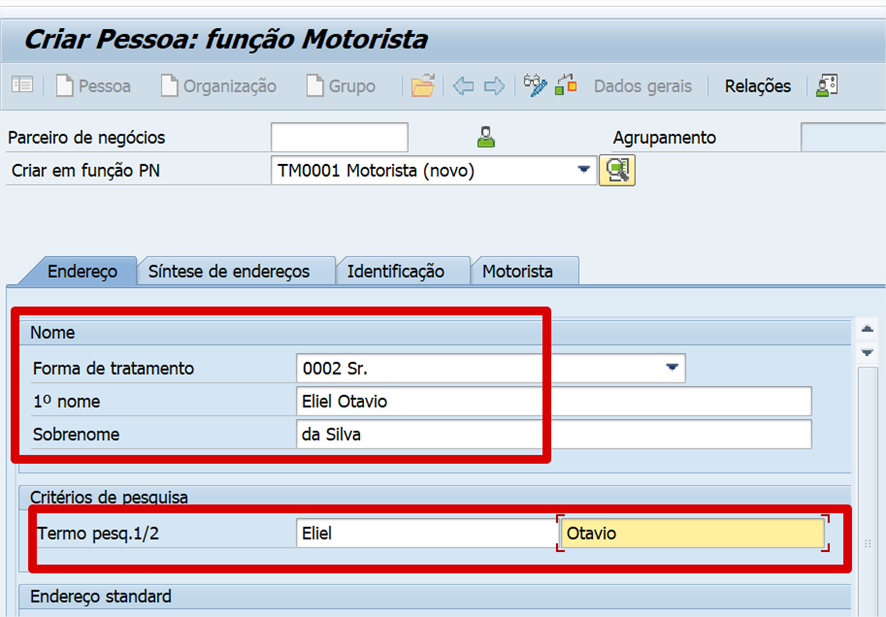
Fill in the required fields in your load:

In the driver tab, fill in the validity:

And click save. You’ve now registered your driver. 😉
Now let’s load the data:
Access the LSMW transaction and enter the name Project, subproject and object. This
structure is used to organize your data loads. Then click on new or press the shift + f1 key.

Then enter the Project description:

Then enter the name of the subproject and object:

Structure ready, next step is to assemble the load:

Go to recordings which will be how we will load it:

Click on new and enter the data:

Then it asks for the transaction, you enter it and press enter:

Then fill in all the data you want and avoid using the mouse to scroll the scroll bar.
I’ll only put the first print, but now you’ll simulate as if you were registering. If you make a
mistake, start again.

After recording, remove duplicates if any:

Go back to the LSMW transaction screen and execute:


It is necessary to go through all the steps:
Define which recording to use using process step (Define Object Attributes):

Define the structure you will use using the process step (Define source structure):
Initially click on the edit option and then on new and the window will appear to enter the
name of the structure.

Then click save:

Define the structure fields you will use using the process step (Define Source Fields):
Initially click on the option to edit and then on the list below the source field that we created,
then click on the icon that looks like a table.

This is one of the important steps, try to open 2 windows next to each other. One you use
your recording by accessing the LSMW transaction and go to goto record and the other is
the screen we are on. The names of the mapped fields will be the fields of the structure we
will place. As per the print

You need to define the size of each field, to do this go back to the original screen and click
on the field and press the F1 key.
Clicking F1 will open the screen below:

On the screen in question, click on the technical information icon:

And the screen below will appear, where you go to the field and double-click on the marked
field:

And this way you can know the size needed because when you click, the following screen
will appear:

And since your table editing screen is open, you fill in the variable type as C (CHAR), I
personally always use char for all load types and the size of the column you found in the
previous step and you must do this for all fields.

Click on the disk to save and go to the next step, which is to define the structure with its
relationships process step (Define Structure Relations):

When you enter you click on edit and then click on save:

And moving on, we move on to the next step, which is the mapping and conversions
between the structure and fields created when you did the mapping ‘imitating the process’ in
the process step item (Define Field Mapping and Conversion Rules:

At this point you make the link from field to field.
First click on the pencil icon to edit and then click on the ‘fields’ field, then click on source
field which will open the window on the right with the structure fields and click on the field
referring to the structure:

After making the link it will look like this below and you will have to make a link from field to
field:

Once the links are made, click save and we return to the steps screen:

The next item you will not execute is the no process step (Define Fixed Values, Translations,
User-Defined Routines).
Create a file in Excel and when saving, set the file type to CSV separated by commas:

Execute o process step (Specify Files):
Click on the pencil icon to edit, then on files in ‘legacy data’ and then on the file icon “add
entry” then a new window will appear. In this new window put the file the location of the csv
file you created, delimited ‘semi-colon’ and in file
structure check the option ‘field names at start of file’ click to confirm and save.

Let’s prepare your CSV file to receive the data:
Going to the LSMW transaction step “Define source fields” you can get the description of all
fields and then enter the field description into the Excel column.

Place the Excel lines with the data of the driver you want to create, in this case I placed a
line as an example:
Something you should always pay attention to is that the CSV (Excel) values must be
formatted as Text (This is necessary so that Excel does not convert the text 0002 to 2,
causing an error in our load).

Go back to the LSMW steps and double-click on the process step (Assign Files) item:

In the step to read the file, double-click on the process step item (Read Data) and when it
appears, click to execute:


Once you have verified that the number of lines you need has been read from your CSV file,
click back and go to the next step:
In the step to read the file, double-click on the process step item (Display Read Data) and
when it enters, click to confirm:

CConfirm that the data was read correctly and go to the next step.


In the step now to convert the read data, double-click on the process step item (Convert
Data) and click on the clock icon to execute and see if the result below returned the number
of lines required and then go back to go to the next step:

In the step to view the converted data, double-click on the process step item (Display
Converted Data) and when it enters, click to confirm:

Click on the data line and confirm that it is correct:

In this step, create the batch file for execution, double-click on the process step item (Create
Batch Input Session) and when it enters, click to execute:


In this last step we will execute the batch input to execute the load, double click on the
process step item (Run Batch Input Session).
Click on the ALV line of the created batch input and then on the clock icon to process.
Depending on the number of records, choose the processing mode. If there are many or
something heavy, put it in ‘background’. In this example, there is only one record, so I chose
the option ‘Display only errors’ and marked the option ‘Expanded log’ and then ‘process’.

Click on folder overview:

Click on log to see how the program behaved and then double-click on the log line:


